How to Set up a Facebook Business Page for Your Private Practice
 While Facebook marketing is an important tool for your private practice, sometimes the pieces of Facebook marketing can feel easier said than done.
One classic hurdle for new therapist marketers is setting up a Facebook business page for your practice. The great news is that setting up your Facebook business page can be a quick and easy task that pays off huge in the long run.
Having an active and full presence on Facebook takes advantage of the platform’s superior ability to target your local, ideal clients. Creating an official Facebook business page gives your practice a sense of authority, providing your potential clients with a place to learn more about your business while solidifying their interest.
How good are you at targeting your ideal client? Take our Ideal Client Quiz to find out now!
In today’s blog, we’ll dive into the steps of how to set up your page properly before we turn our focus on to how you can make it truly awesome.
4 Steps to Setting Up Your Facebook Business Page on the “New” Facebook
Note: This tutorial will walk you through the steps to creating a Facebook Business Page in the “New” layout design (May 2020). If you are still using the “Classic” Facebook layout, please click here to be taken to the correct tutorial.
1. Create Your Facebook Business Page Using Your Personal Facebook Account
One important thing to know about your new business page is that you’ll manage it through your personal Facebook account, so you’ll need to open Facebook in your browser and log in to your personal account before we go any further.
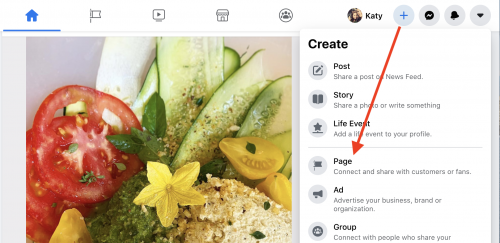
Next, you’ll simply navigate to the top of the Facebook homepage and click the “+” button to the right of your first name, which will create a drop-down menu (see below).
In that drop-down menu, select the “Page” option as shown above. And you’re already on your way!
2. Give Your Page a Name, Category, and Description
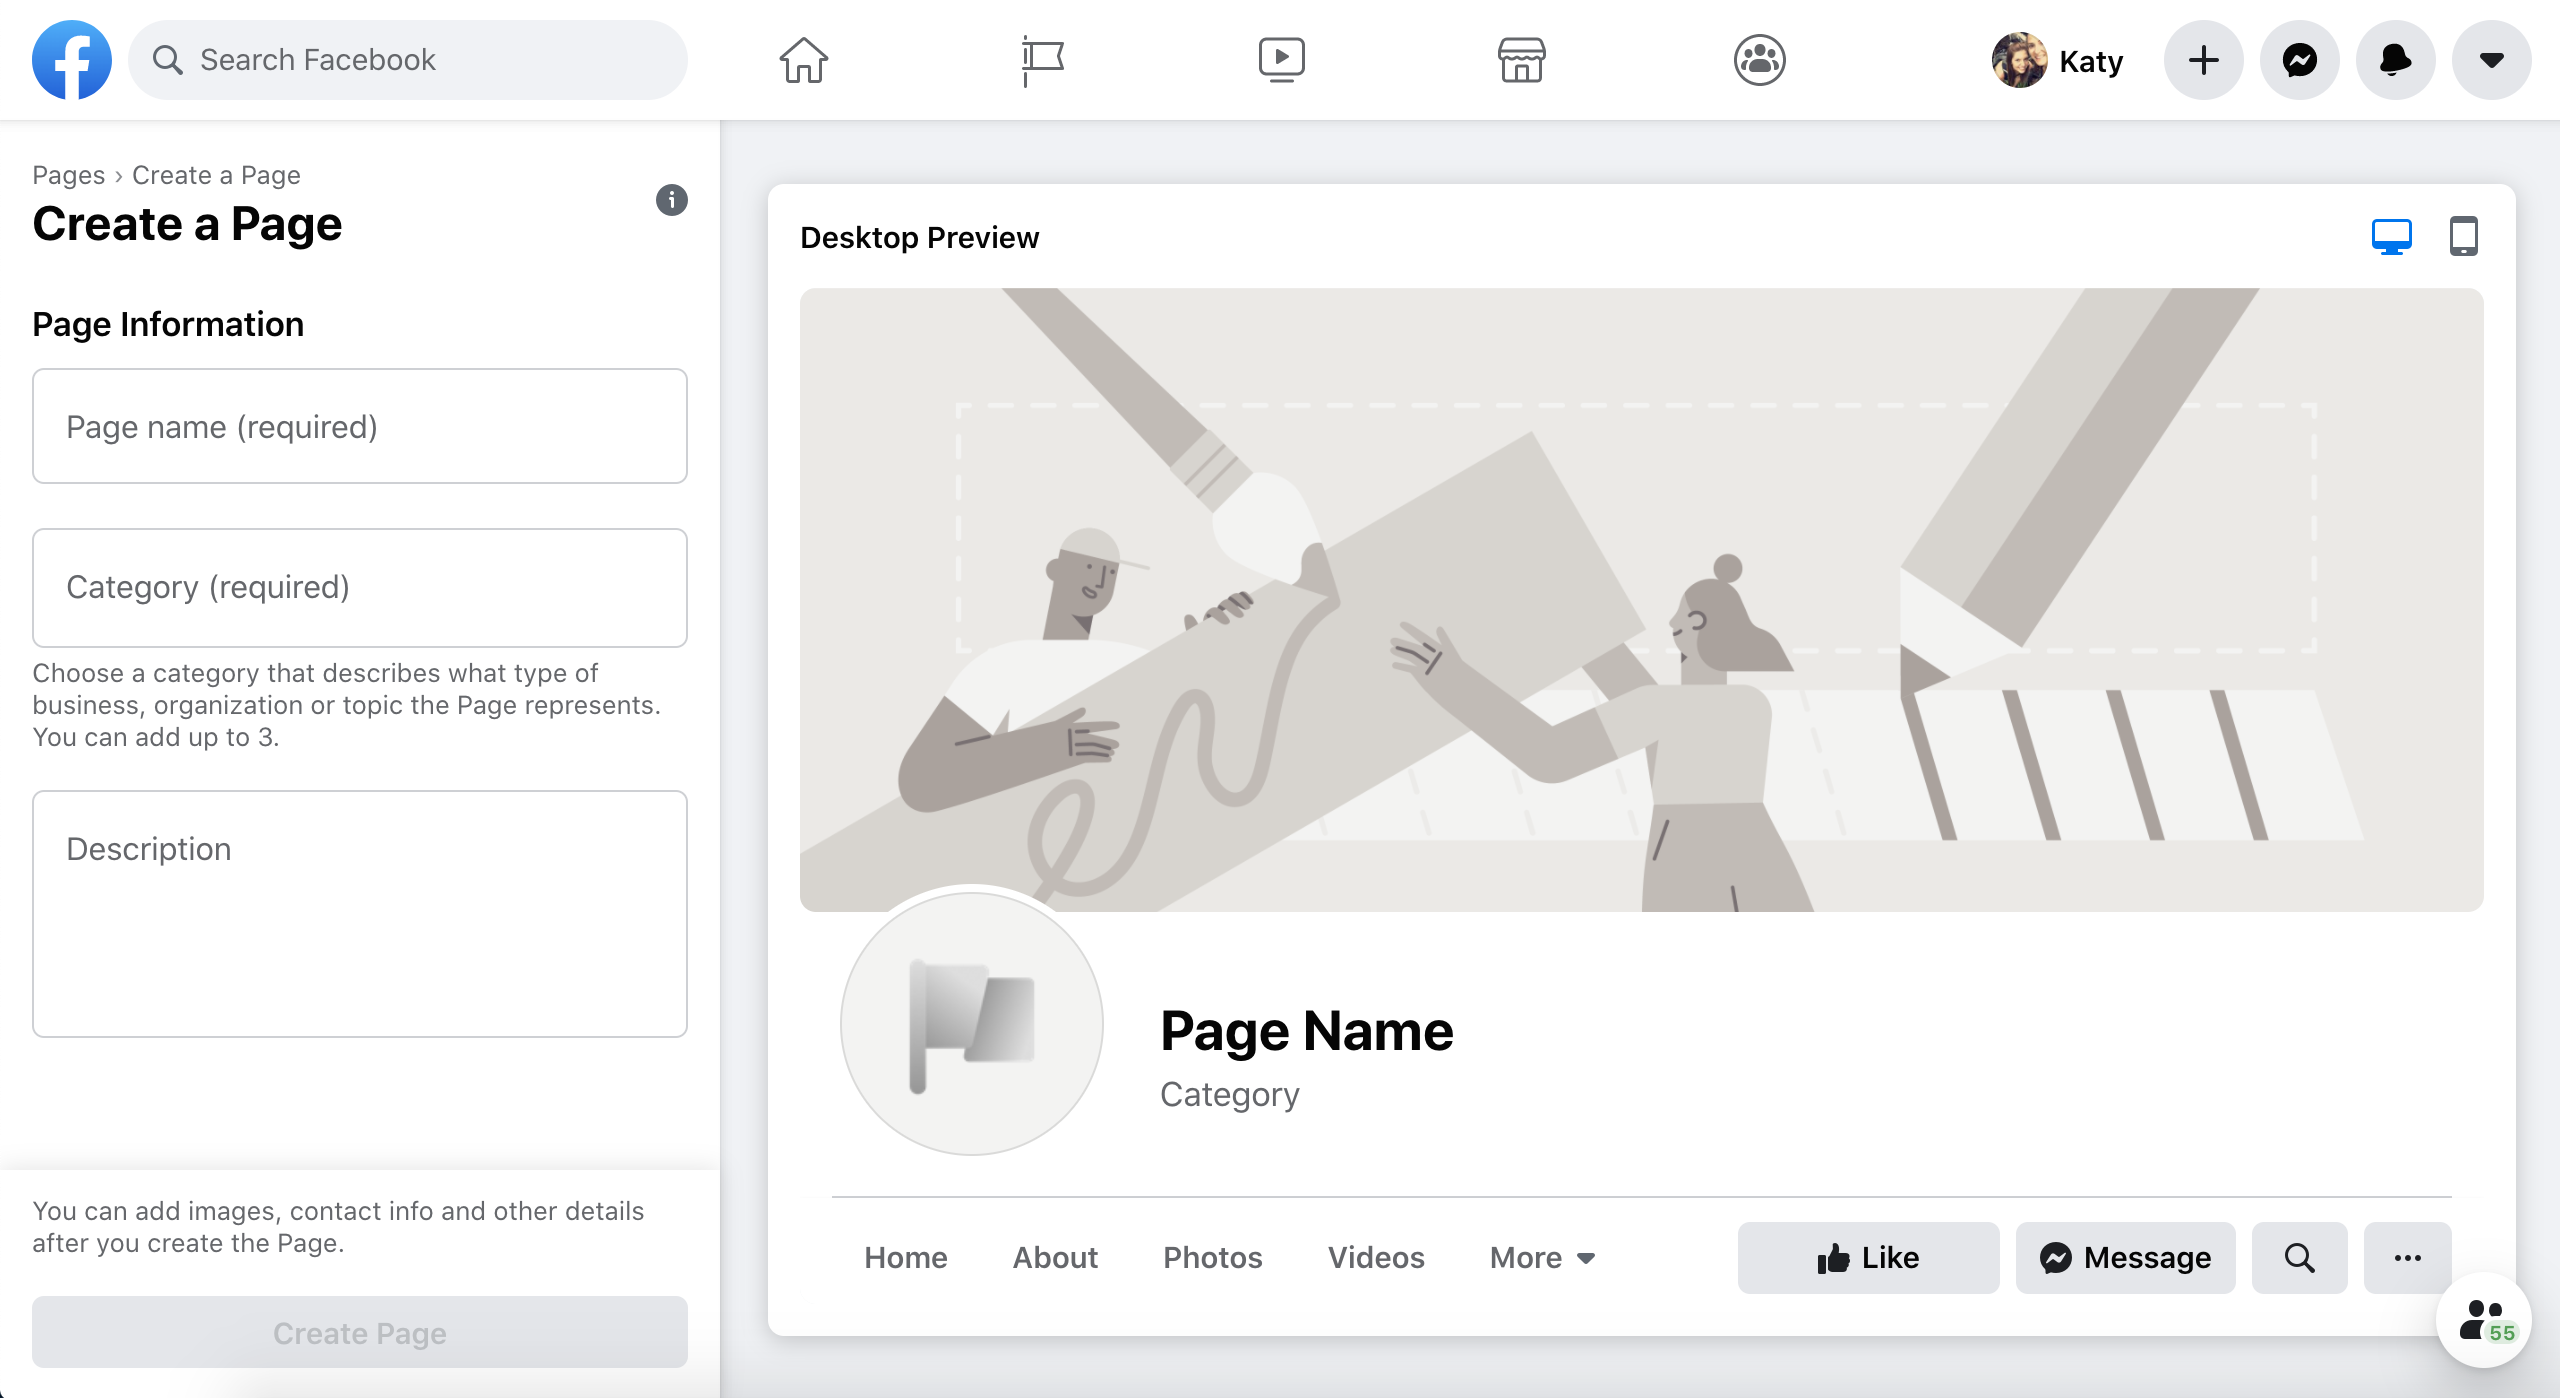
Once you click “Page” from the drop-down menu options in step 1, you’ll be asked to enter in some basic information about your new page on the left side of your screen, including its name, category, and description:
We recommend that you use the name of your private practice as the name of your Facebook business page. For example, “New Horizon Therapy” as opposed to “New Horizon Therapy Page.”
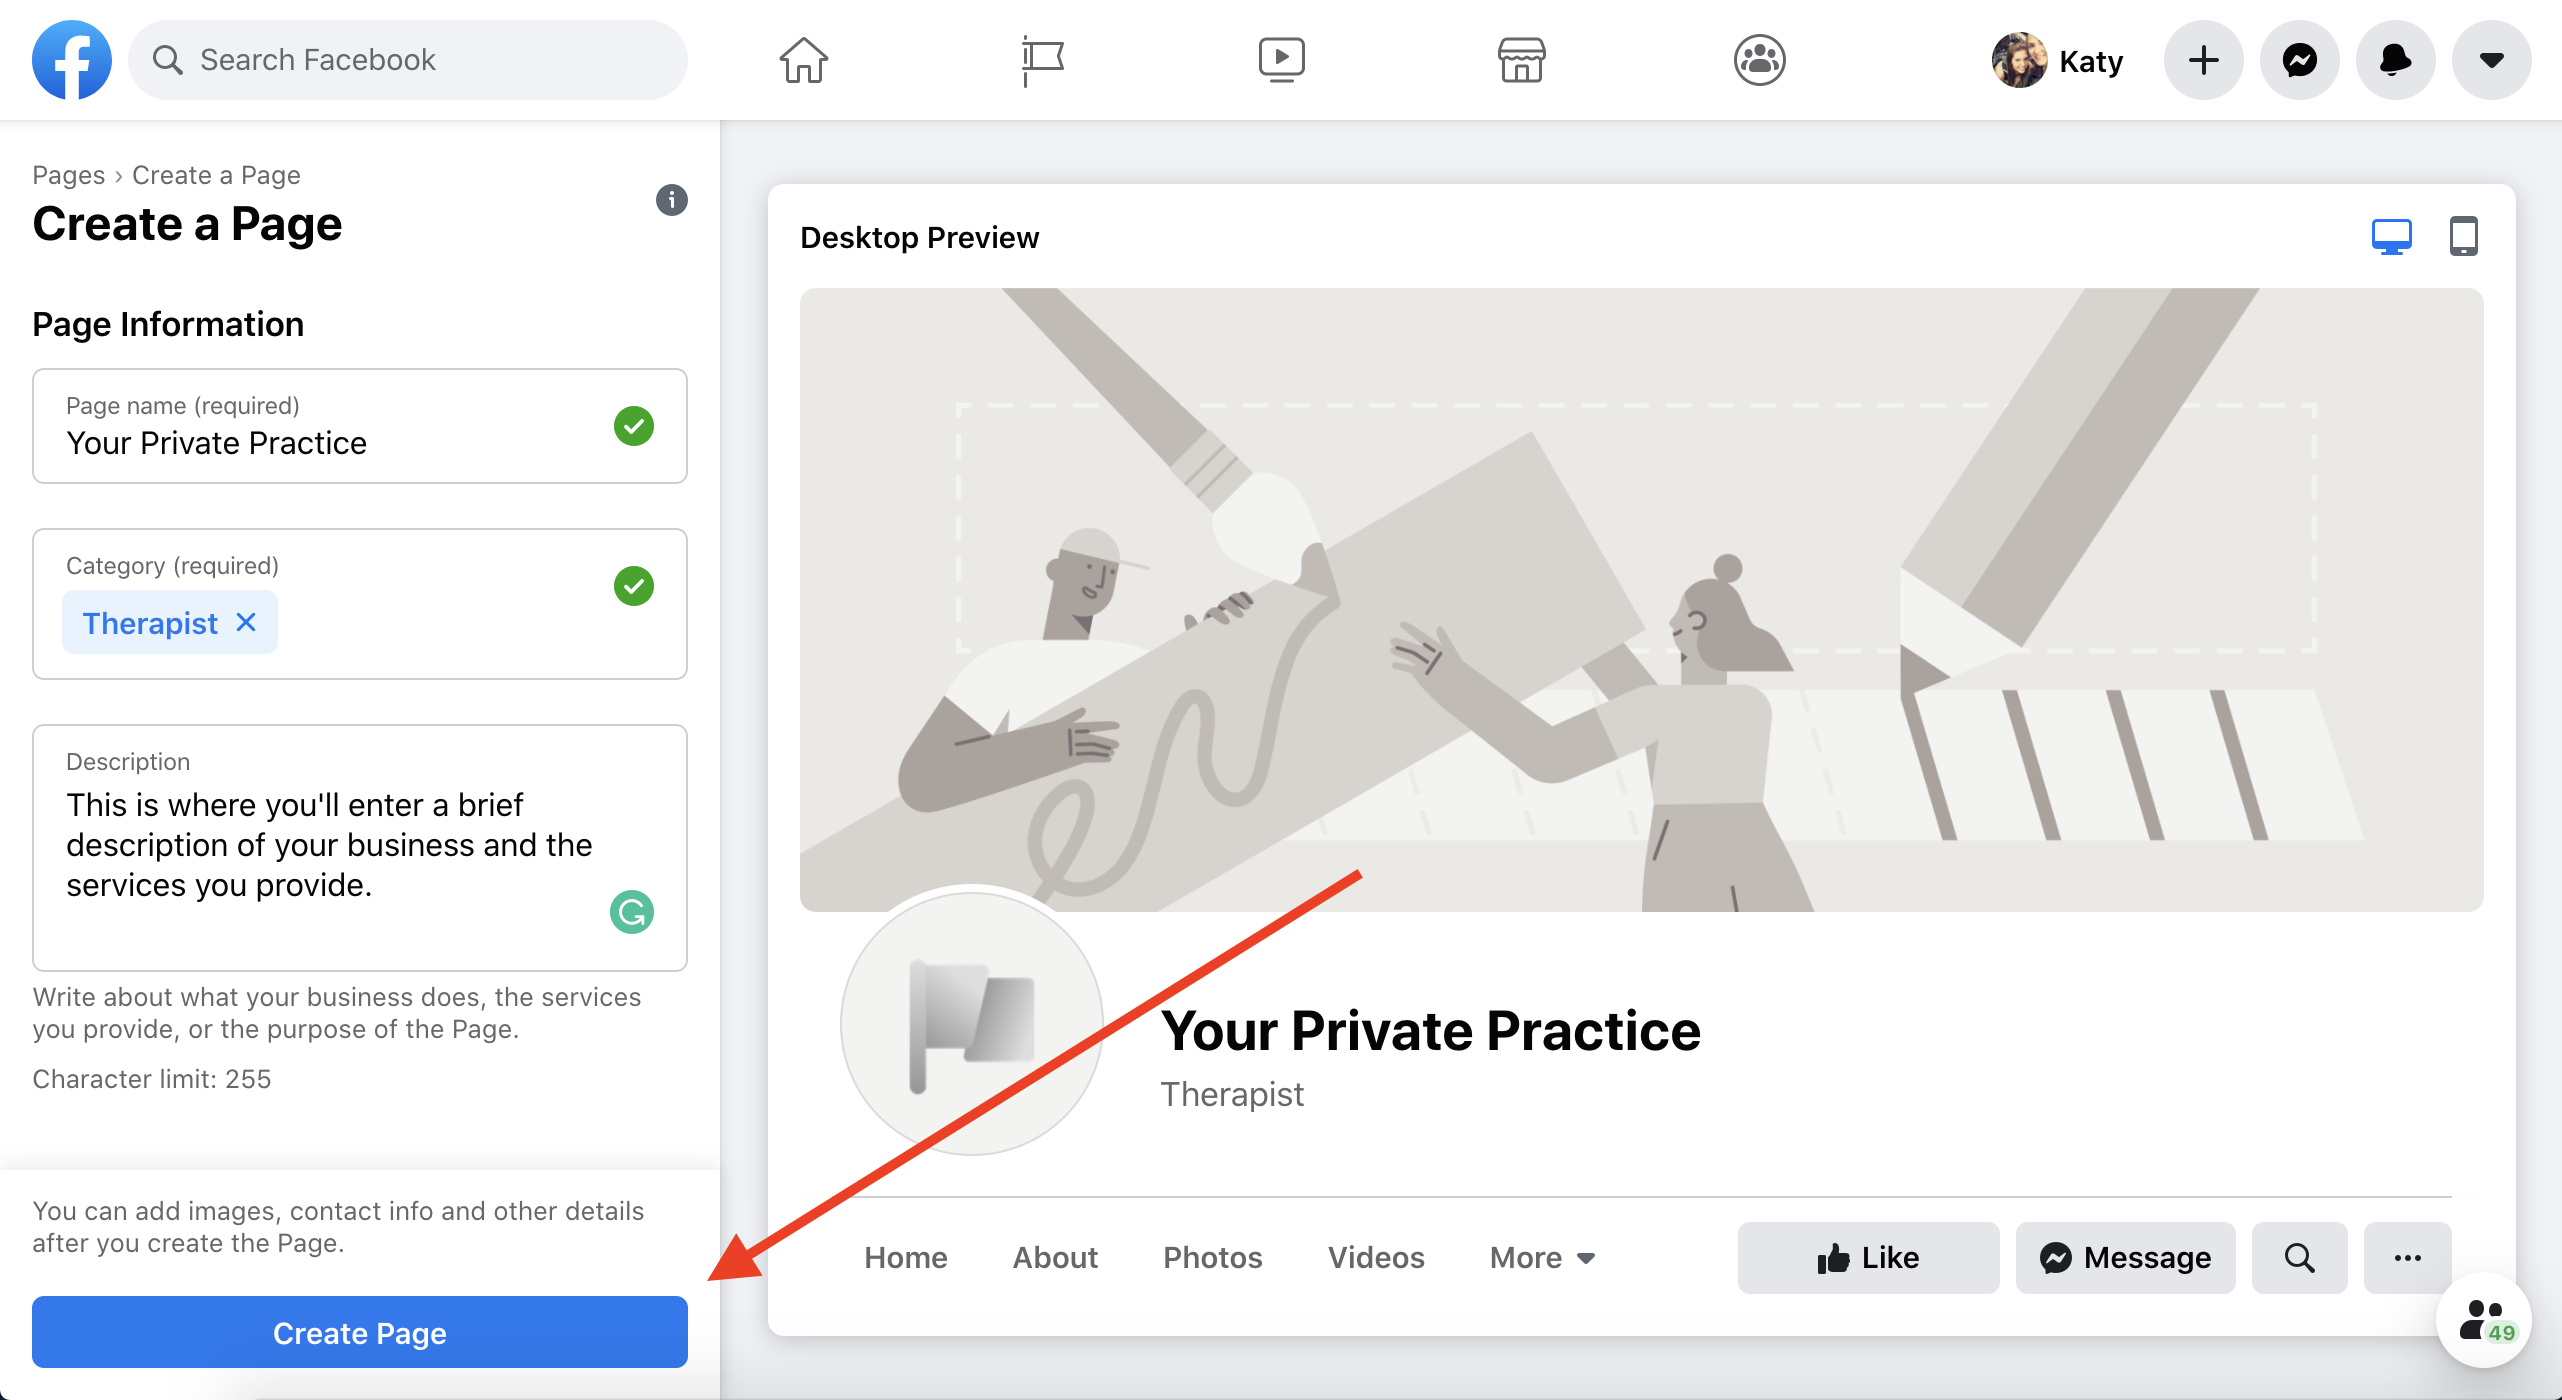
You’ll also be asked to select a category for your page (we recommend “Therapist,” but this is part up to you!), as well as a brief description of your business. Don’t worry too much about getting this part perfect right now. You can go back in and edit this description at any point in the future if you choose.
Once you’ve answered these initial questions, simply click “Create Page” to continue:
3. Upload Your Profile & Cover Photos
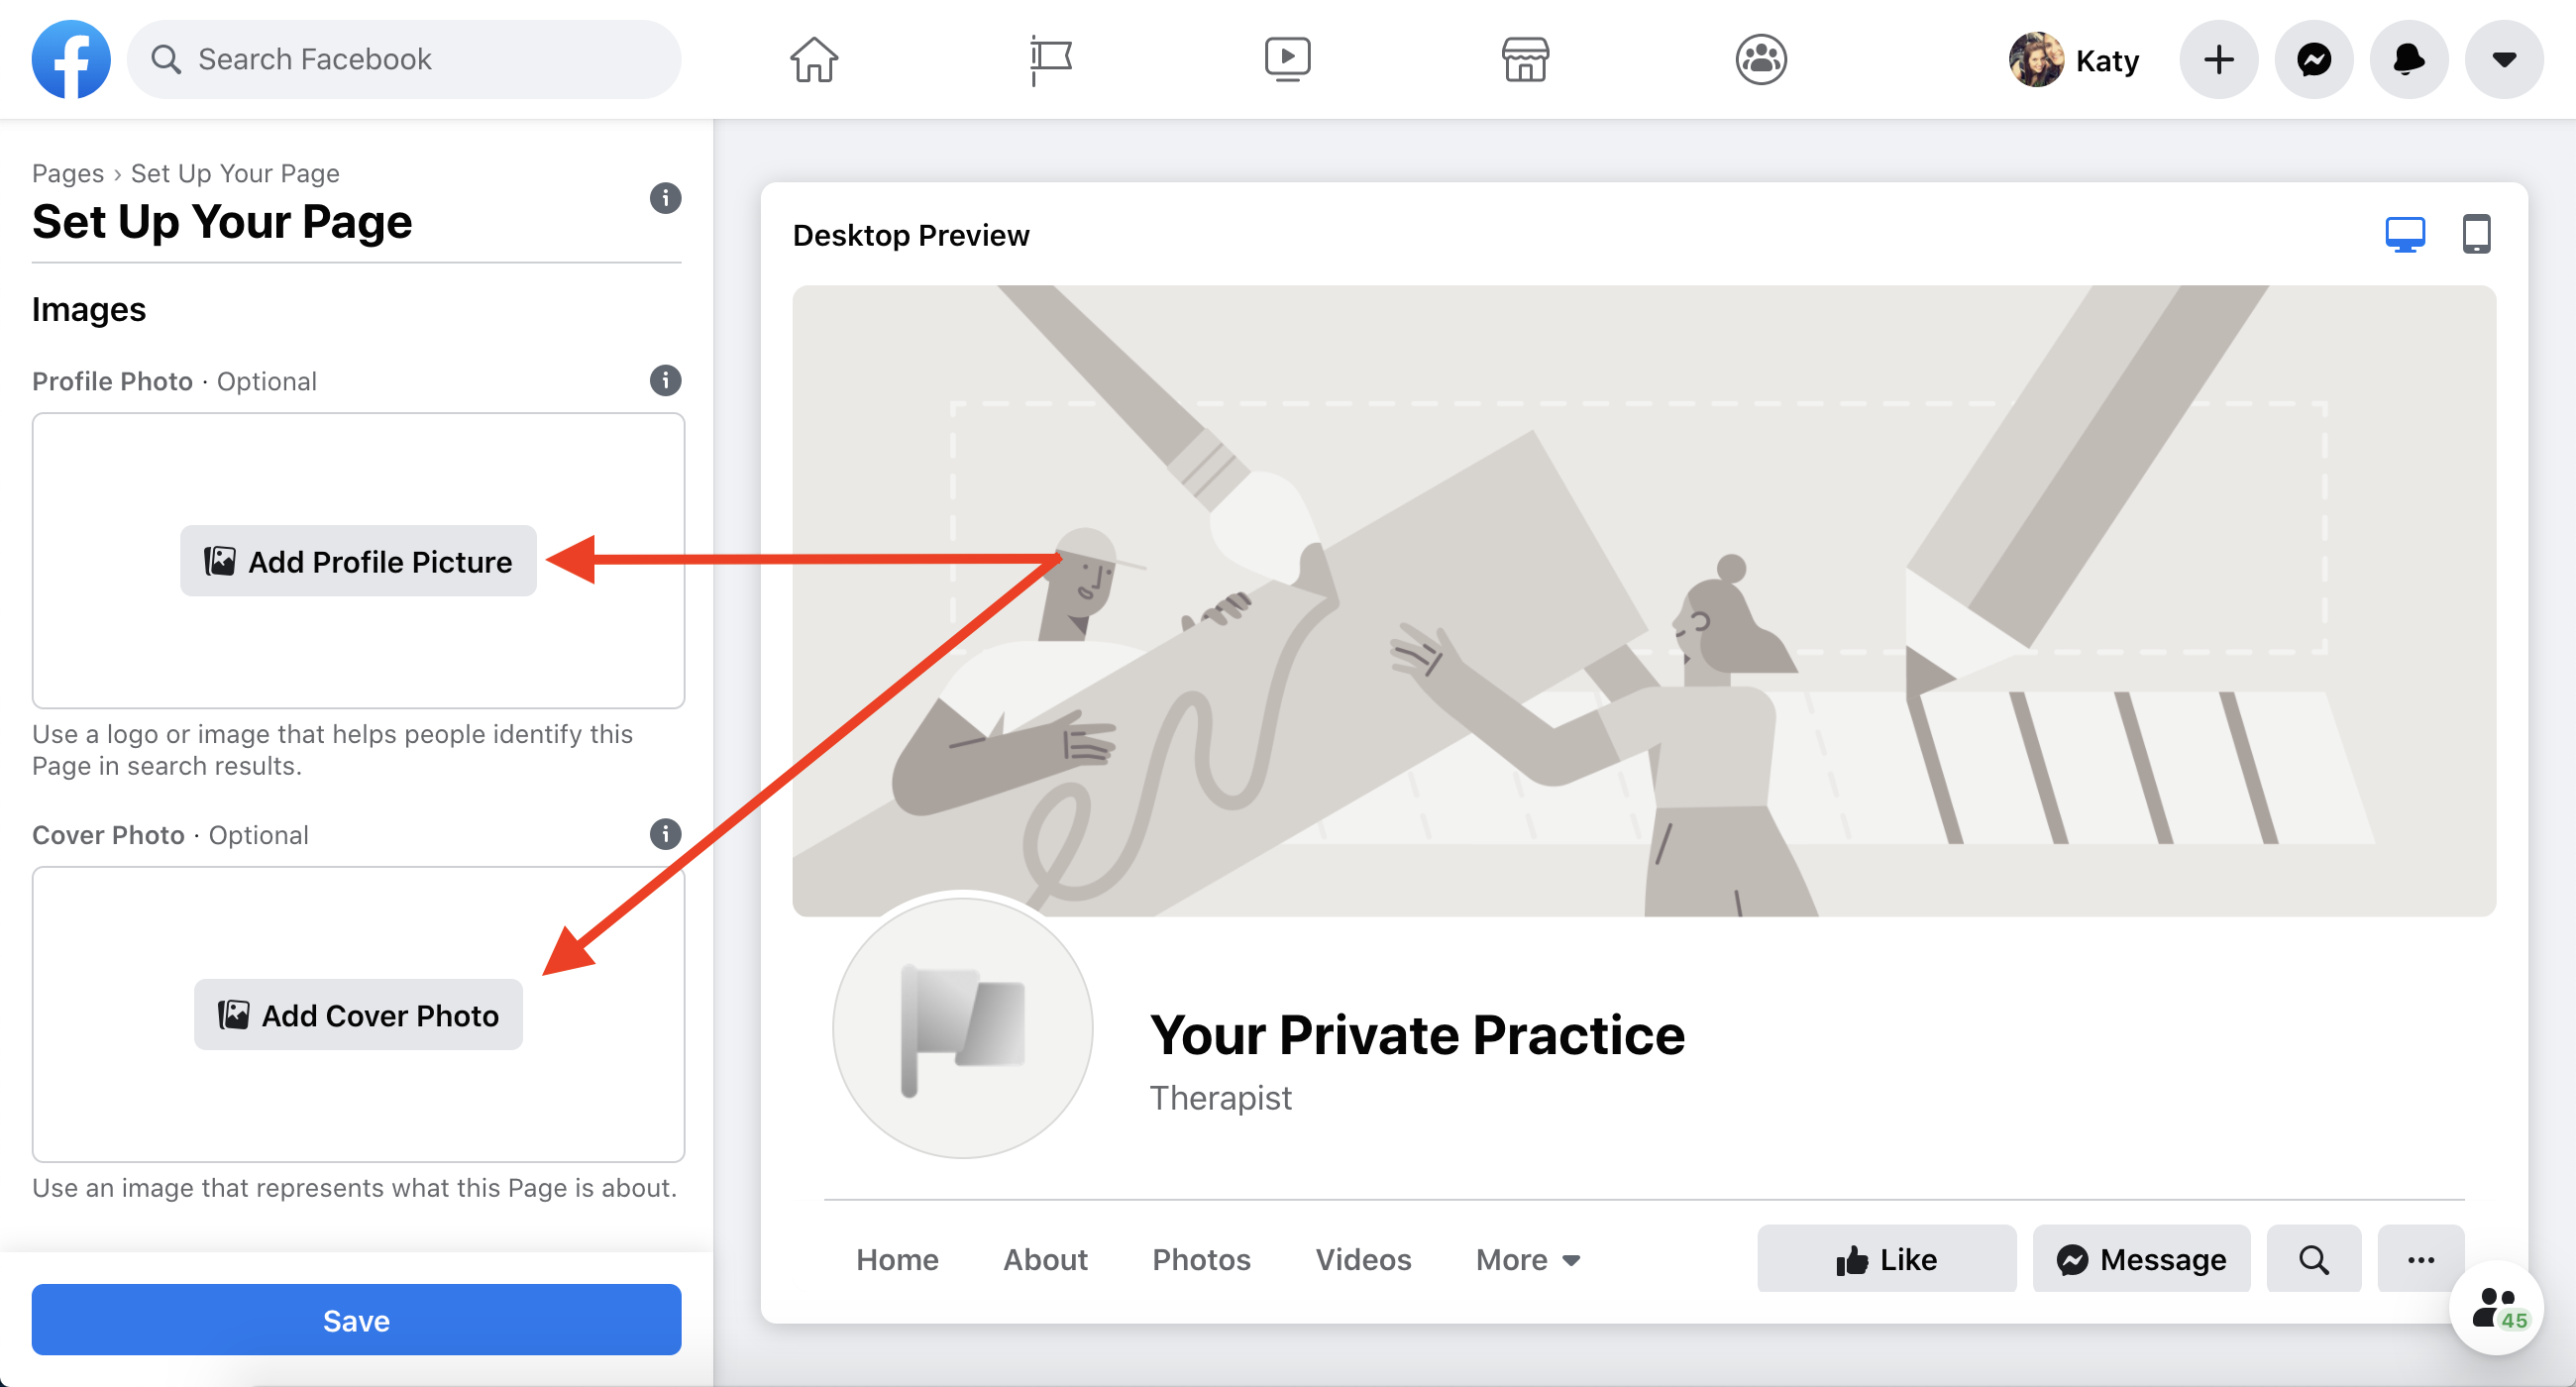
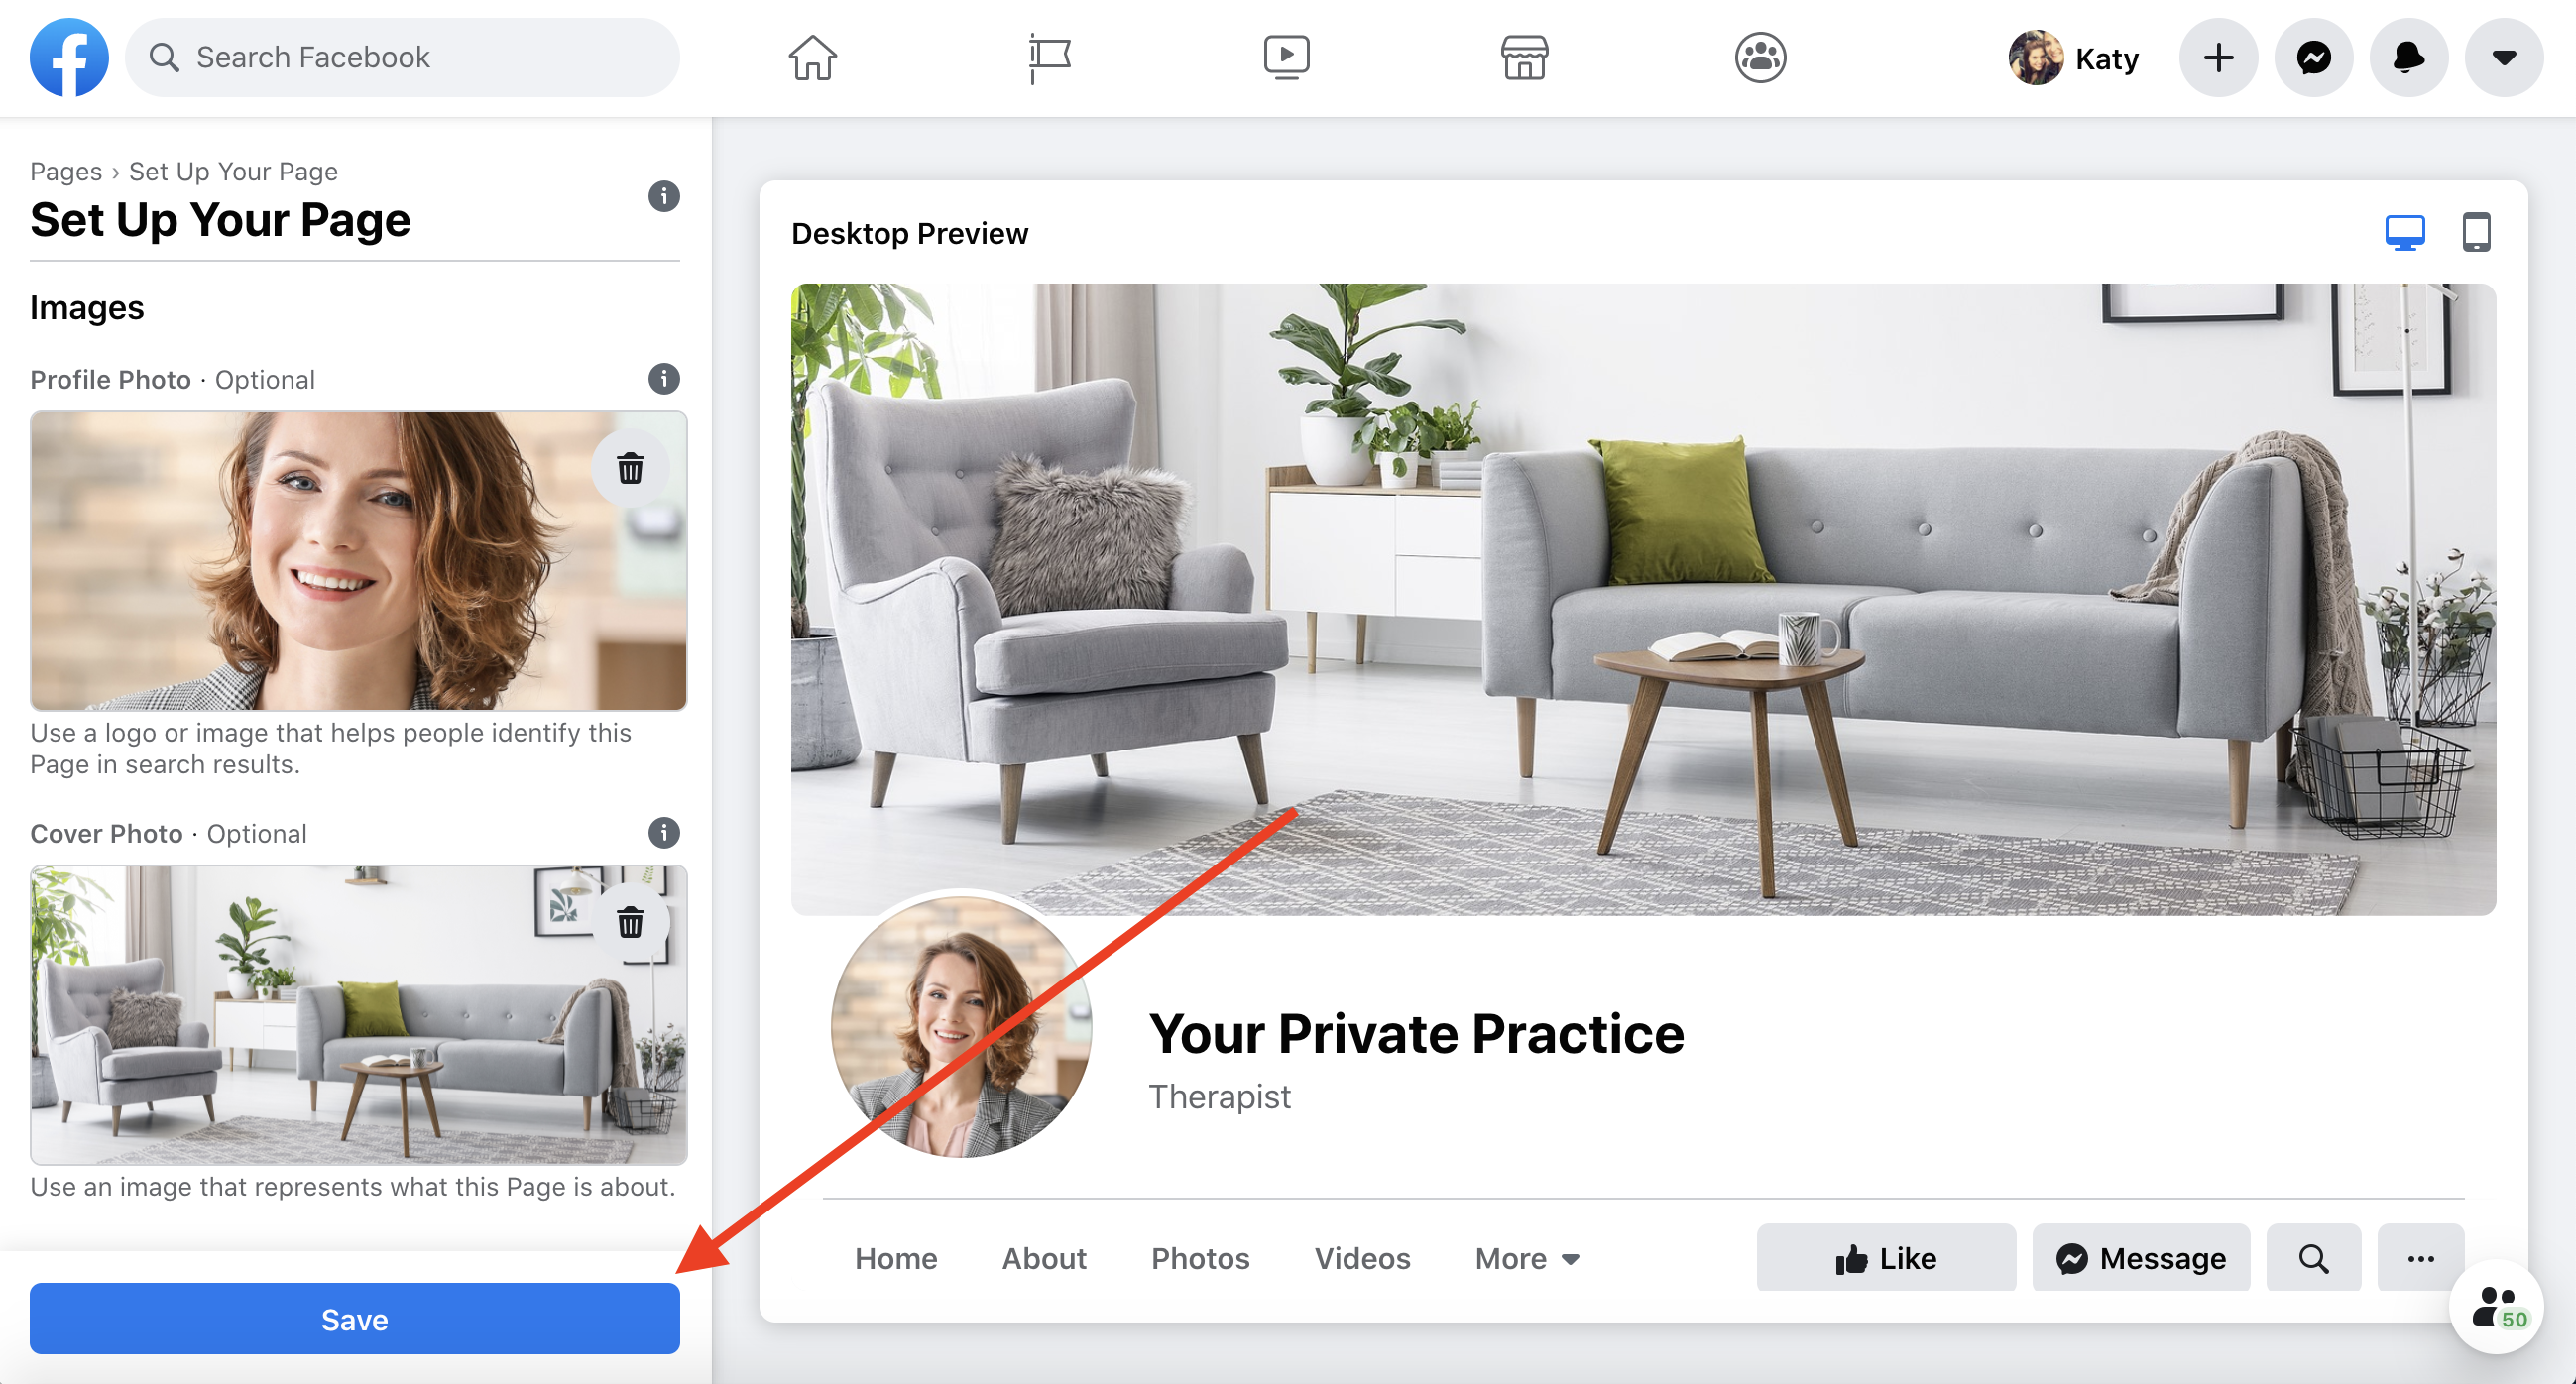
Once you’ve created your page in step 2, you’ll notice that there are now 2 new fields in the menu on the left side of your screen asking you to add a profile picture and cover photo, as shown here:
These are arguably the most important visual elements of your Facebook business page – what will really make it look like your private practice. So, it’s important to choose photos that best represent you and your business, and that will help people identify with your Page easily.
Click these buttons to upload photos for each of these areas:
Profile Picture
You have a couple great options when considering what to upload as your profile picture. One good option for your branding is to use your private practice’s logo, but this might not work as well if your logo is outdated or has lots of fine details that won’t show up well in a small size. If this is the case with your logo, you can also make a stunning profile picture by using a well-lit photo of your office or, if you’re a solo practice, a professional headshot.
The ideal size for your profile picture is any square image that is at least 720 pixels wide. Keep in mind that Facebook will automatically crop your image to circle format, so choose an image that doesn’t lose anything important – such as part of your logo – when the corners are removed.
For example, if your logo includes your business name across the entire bottom of the image as it does below, it’s not going to display correctly when cropped:
However, by simply adding additional white space around the edges, you can essentially “zoom out” on your entire logo so the entire business name is displayed, even after it’s been cropped:
Cover Photo
According to Facebook, Pages with cover photos tend to get more likes and visits than Pages without. When it comes to your cover photo, the most attractive option will always be a colorful, high-quality photograph. Attractive or cute photos of your private practice office or therapy room work very well here to keep your imagery on-theme throughout your entire Page.
The ideal size for your cover photo is any wide horizontal image that is at least 315 pixels tall and 850 pixels wide.
Once you’ve uploaded photos for both of these areas, click the blue “Save” button.
4. Fill in Your “About” Section Details
To make your Facebook business page feel and look truly complete, there are a number of little details to input about your practice. The good news is that Facebook has stuck them all in one easy place!
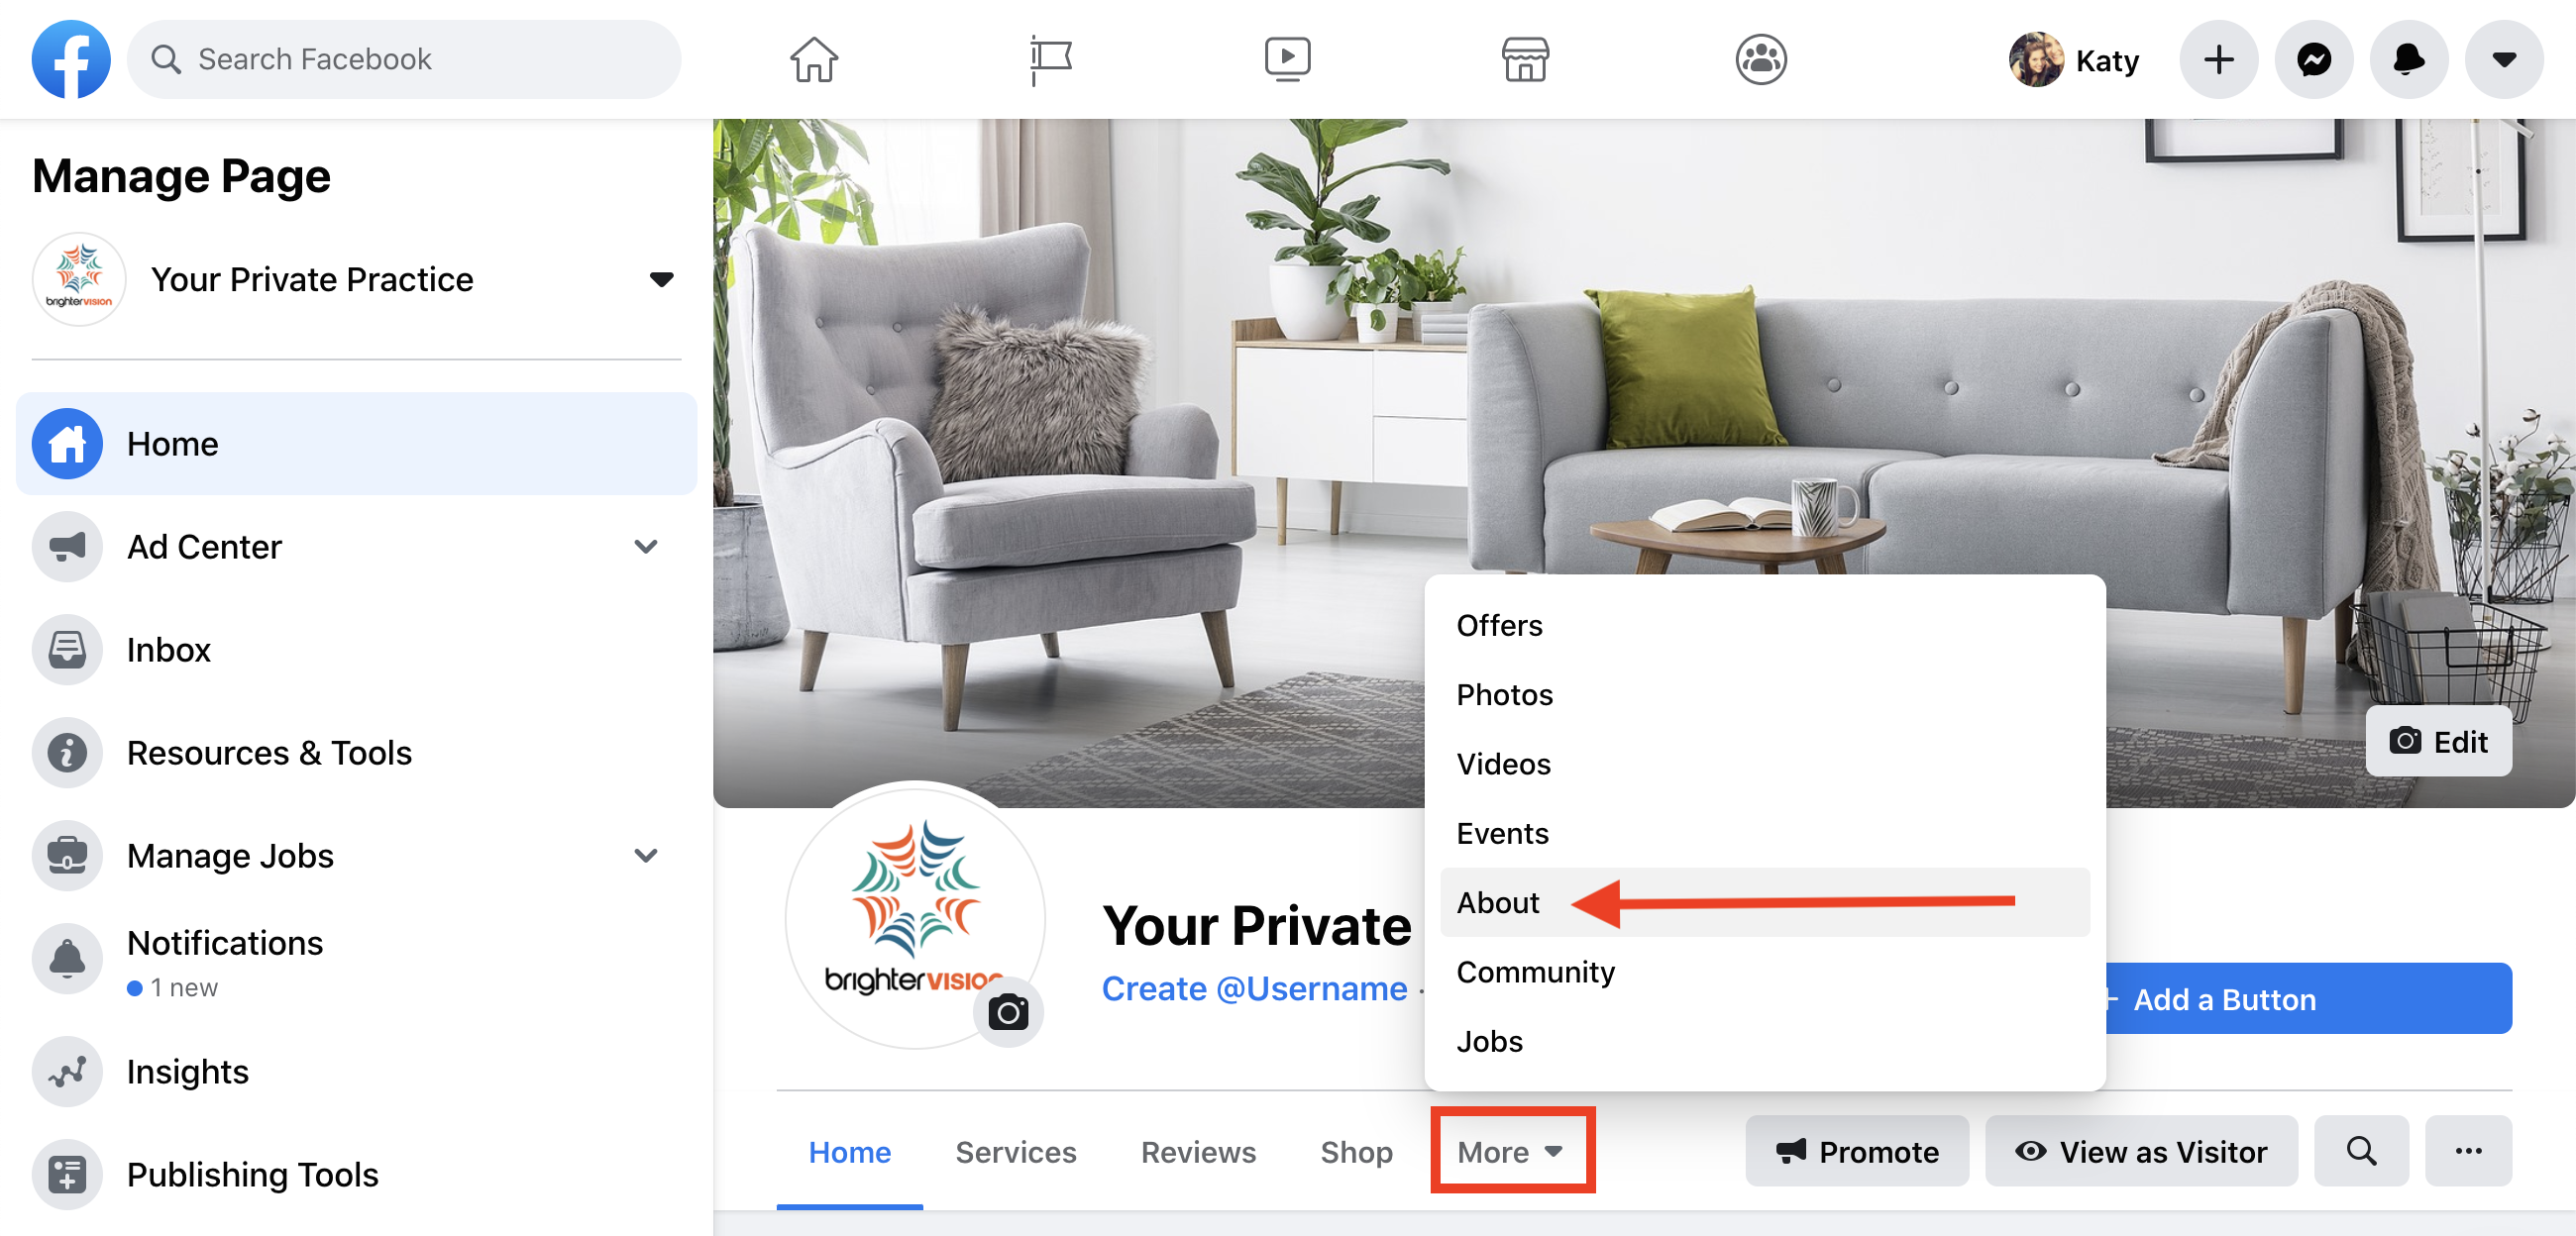
Navigate to your page’s “About” section by clicking the “More” button located underneath your practice name and selecting “About” from the drop-down list that appears, as shown here:
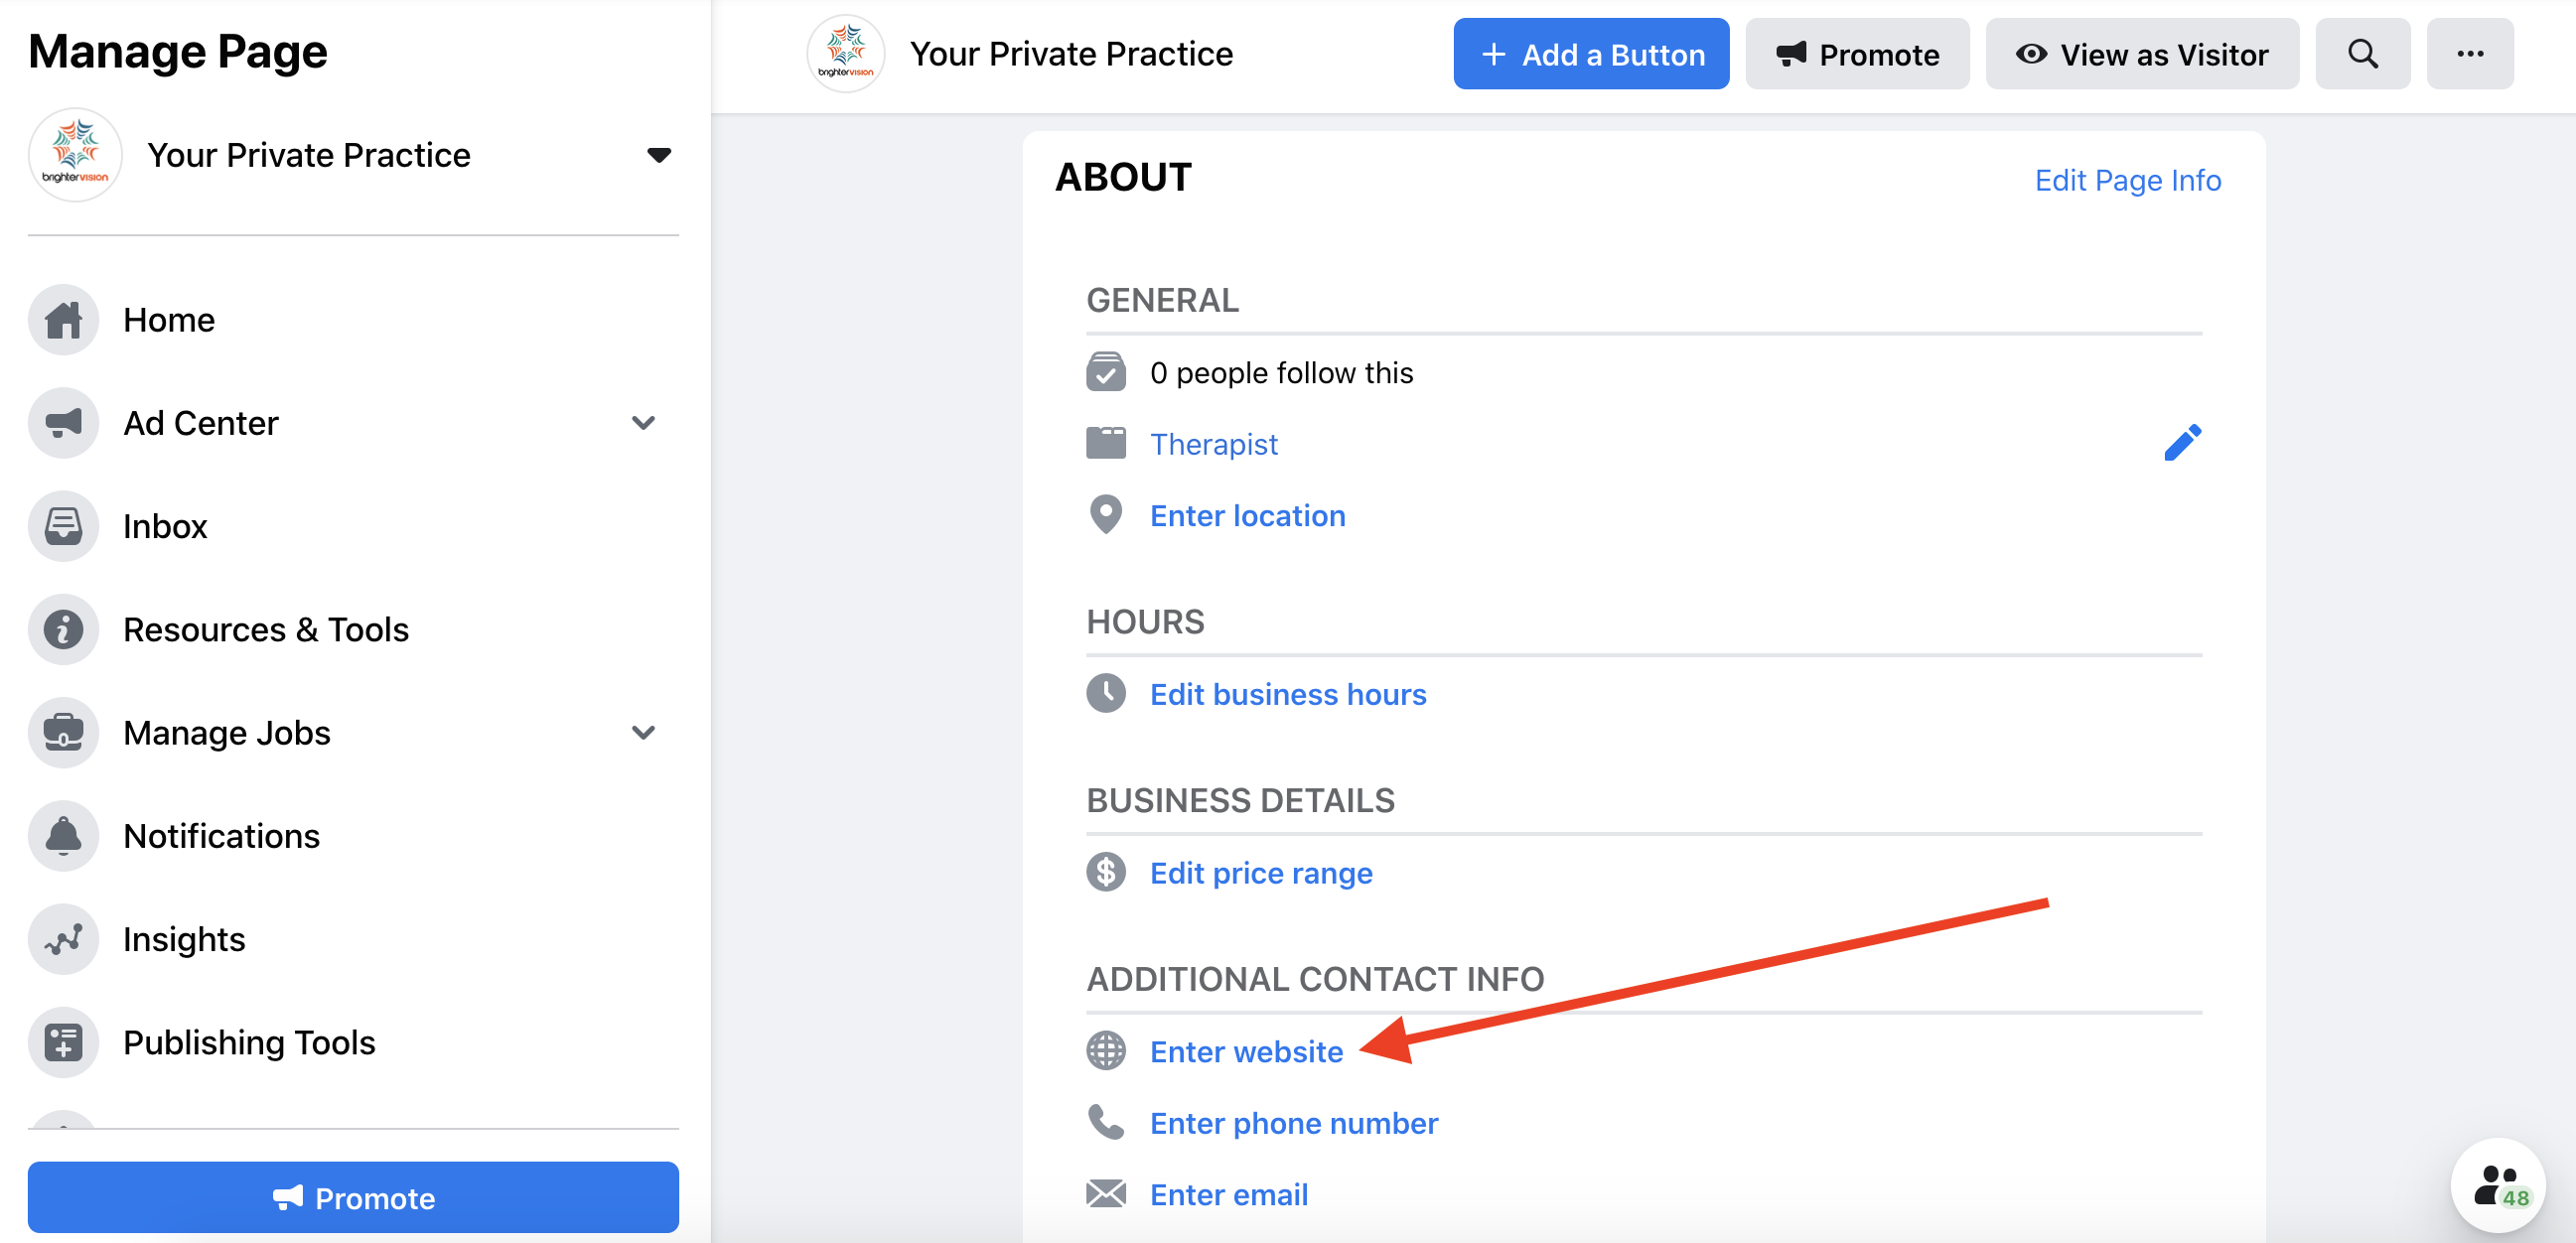
On the next page, you’ll be presented with the list of information that Facebook wants you to fill in about your practice. Take a few minutes to fill things out as much as possible in this section by clicking on the link for each item. For example, to add your private practice website to your Facebook Business Page, click this “Enter website” link and type your website’s URL in the popup that appears:
Fortunately, most of the information you’ll either know by heart or be able to look up quickly.
And that’s it! Your private practice has a beautiful new Facebook business page to represent you online. So now you’re ready to take the steps to really pump up your page into the best it can be for you and your practice.
Is your therapist website the best it can be? Check for yourself with our free Website Grader!
How to Make Your Facebook Business Page Awesome
Add a Call-to-Action Button to Your Page
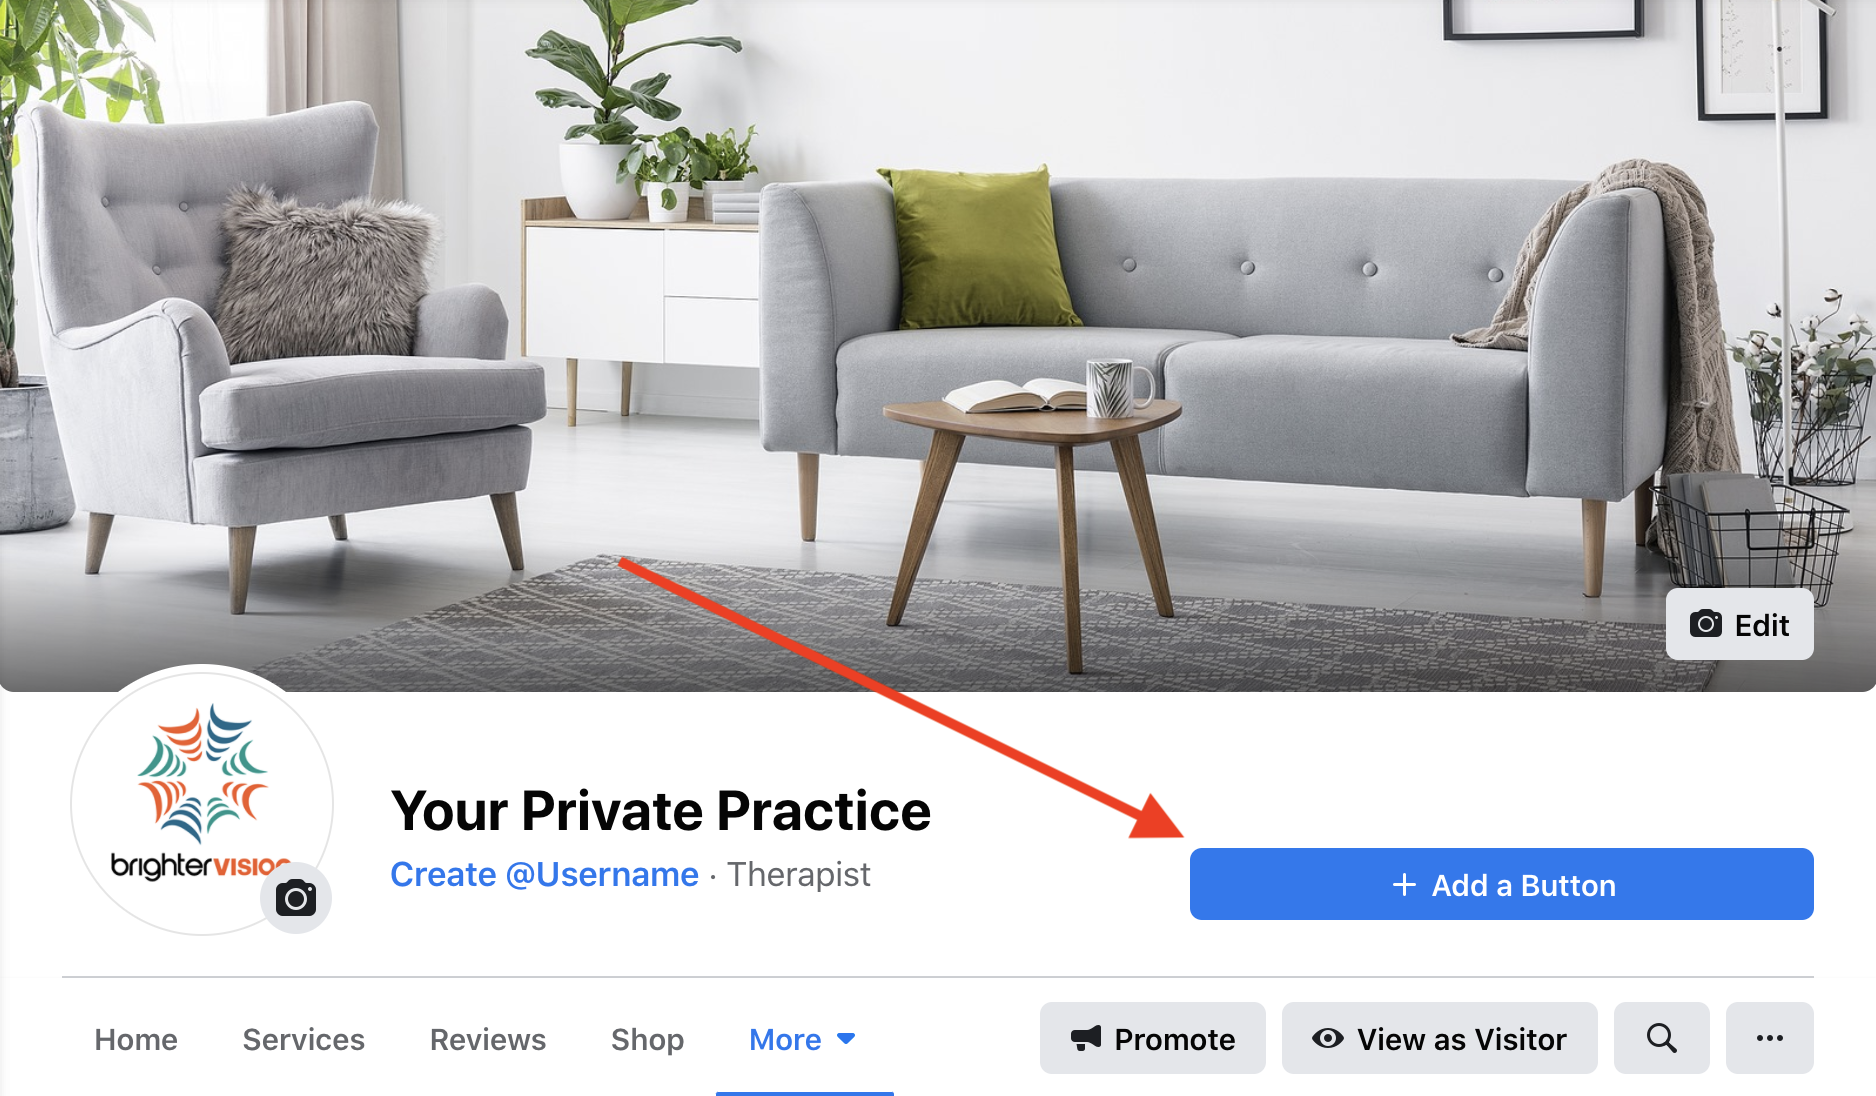
One of the best ways to start seeing some real engagement with your new page from your potential clients is to add a call-to-action (CTA) button. From the Home section of your new Page, find the big blue “Add a Button” button on the right side of the screen.
Clicking this button will give you the ability to choose from several different types of CTA buttons that ask the visitor to do a variety of different things.
Choose the option that speaks the best to what you want people to do once they reach your page. Our suggestions would be a “Call Now,” “Contact Us,” or “Learn More” button that directs the visitor to your practice’s website.
Customize Your Page’s Web Address
Another fun feature of Facebook business pages is that Facebook allows you to customize the URL that people use to reach your page.
This is a great move for your marketing in general, simply because it’s a lot easier to remember and recommend “facebook.com/YourPracticeName” than it is to remember random letters and numbers! Customizing your page’s web address with your username also makes it easier for people to find it in searches on Facebook, effectively increasing your page’s search engine optimization (SEO) at the same time.
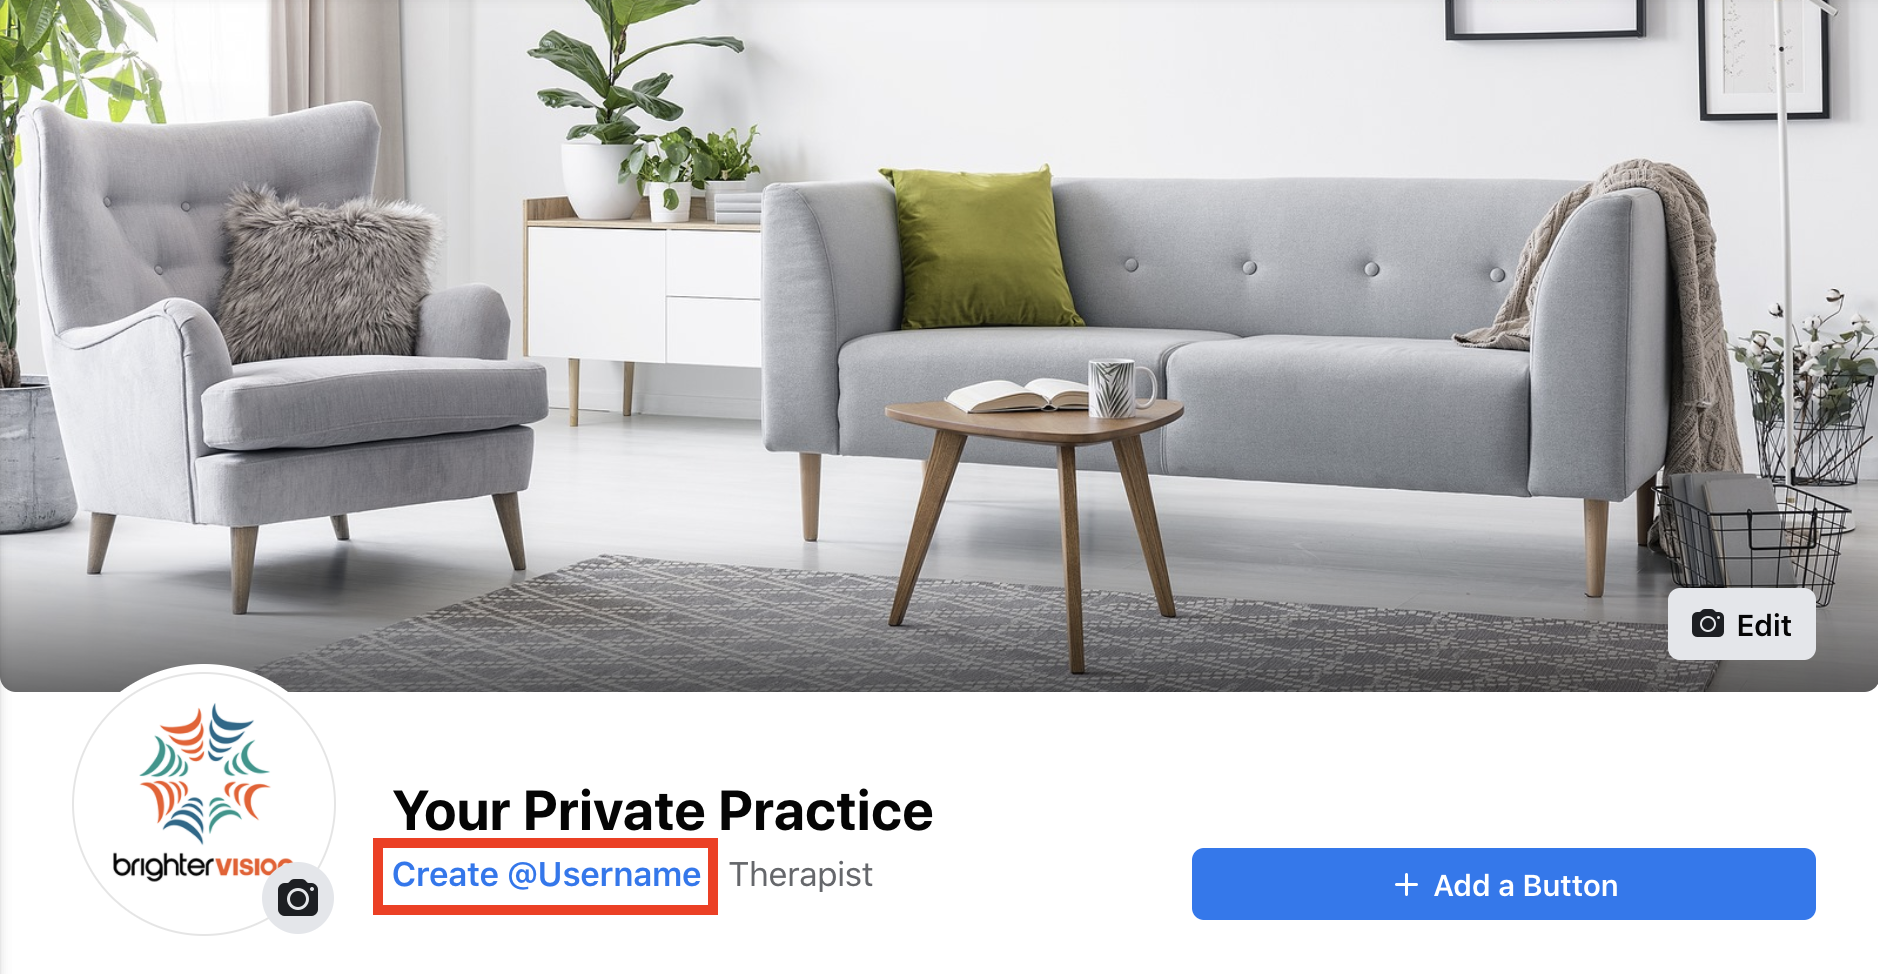
To get started, click on “Create @Username” just under your Page name, as shown here:
Facebook will then ask you to select a “username” to use as the tail of your page’s URL (we recommend using the name of your private practice again). For example, if you made your username “HopeRisesTherapy,” then your Facebook page’s URL would be “facebook.com/HopeRisesTherapy.” Confirm your username of choice, and enjoy your new URL!
Market Your Facebook Business Page by Posting Regularly
The best way to market your practice’s new business page is to create a regular posting schedule. Posting regularly and predictably not only gets your name out there so your posts can start showing up in people’s Facebook searches, but it also helps to build your brand’s reputation and trustworthiness.
(Think of it this way: how much less would you trust a business whose Facebook page has only ever posted twice?)
Along with developing a dependable posting schedule, it’s also important to keep your posts thematically similar. It’s also helpful for your page to develop a “voice” of its own so it sounds like your posts were written by the same person and not multiple different viewpoints. Little touches like these really help to pull your posting strategy together into something truly professional – and effective.
Learn the anatomy of Facebook posts for a therapist here.
Make Facebook Posting Easier Than Ever
If you’re looking for a way to take your Facebook and Social Media Marketing to the next level, we’ve got you covered.
Did you know that Social Genie by Brighter Vision takes away all of the pain when it comes to planning and creating social media posts for your practice?
If you’d like to get started on a 14-day free trial so that you can save yourself from the headaches and hassles of social media marketing, just fill in your info below:


